One of the best ways to improve your photography is by upgrading your lighting. Whether you’re shooting on location or in your studio, lighting is one of the most important elements to consider. Fortunately, there are many options to choose from, and each has its benefits and drawbacks.
Studio lighting is a tricky beast, the kind of thing that can effectively make or break a photo. A good studio needs the right kind of lights, they need to be installed by a professional like those you’d find at https://calibreconnect.com.au/electrician-sydney/ or similar websites, and they need to be placed in the right place. Furthermore, good lighting can be a godsend in the right hands, but it can also be disastrous when done poorly.
So here are five tips to improve your studio lighting.
Always Keep The Color Temperature
The biggest mistake most photographers make when they begin shooting studio pictures is that they forget to think about the color temperature of their studio. The problem is that the studio’s color temperature can be significantly affected by the lighting equipment and other equipment in use. The most common mistake is that the color temperature is set too high. This makes the light source look too blue, which is a common problem in natural light.
Include Some Shadows To Add Or Create A Three-Dimensional Look
Do you know that nice light that makes your subject glow and your photos look good? It’s the same light that makes them look like they were taken in a studio and not in a bedroom. This is why modern digital cameras have replaced film with their ability to capture light as it bounces off of every possible surface. If you are not using this capability, your photos will not look like they were taken at the same time as the ones you see in magazines. The shadows are never going to be deep enough, and the highlights will never be bright enough. If you want to learn how to take beautiful studio shots, this tutorial is for you!
Use Front Lighting
The goal of this blog post is to point out the need for using front-lighting judiciously. In some cases, the light from the main light source is too harsh, causing cast shadows. In other cases, you may not be ergonomically positioned to use front-lighting, and front-lighting comes too close to the subject for you to use it. In still other cases, using the main light may obscure the subject, and you need another source of light to fill in the shadows.
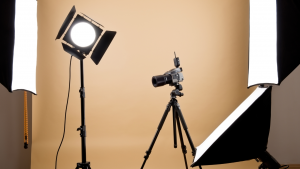
To address these challenges, you may consider alternative front lighting options. For instance, you can use softbox lighting that provides diffused and even illumination, thus minimizing harsh shadows and creating a flattering look for portraits and product photography. However, setting up softbox lights can require rewiring or installing additional electrical outlets to accommodate their power requirements, for which you might have to rely on a certified local electrician to get the job done effectively. Similarly, you can also use studio strobe lights and continuous LED lights as they offer versatile lighting solutions.
Put The Light Source Near To The Subject
Lighting is one of the most important aspects of any photographic shoot and can make or break your images. A well-lit photograph is one of the few things that can truly stand on its own, so it’s important to spend some time experimenting with different studio lighting configurations and techniques until you find the right combination. While there are many lighting setups to choose from, some of the most common types of lighting used in photography are the fill light, the key light, and the backlight. The best way to improve your studio lighting is by studying the light itself. The best lighting comes from learning how to read light and learn how to manipulate it with flash, reflectors, and other tools. All of this, however, comes into play once you’ve installed the lights wherever they’re needed, which may necessitate the assistance of an electrician. You may have a lot of ideas about how the lighting in your studio should be set up to get the best photo. For the same, you could seek assistance from a company similar to S.E. Electric services in Anaheim.
Use A Broad Source Of Light
We all know that the best light is the one you have- or at least that’s what I’ve always been lead to believe. I’ve heard that it was a popular saying even before, and I’ve also seen that it has been repeated by many other photographers, including those who have some of the best setups in the world. But as a travel photographer who’s often away from my gear, I’ve found that a decent set of lights can make all the difference. If at all you face any issues with regards to the lights not working properly, you could call in an expert from somewhere similar to Wenbrooke Services and get it checked. In the world of photography, there are many decisions to be made to get the perfect picture. The key is to use proper lighting, which requires you to consider both the subject and the environment of the photos. Some photographers choose to use a smaller light source for a more flattering look, and others prefer a broad light source to make their scene stand out from the background.
Whether you’re in a dark room, under the shade of a tree, or shooting in a broad open space, one thing is true: good light is important. It helps you achieve your creative vision, and it can even help you to see better. But good lighting is not easy to find, especially if you’re in the middle of the woods in the middle of the day.